Creating Lightning McQueen chocolates is a fun and creative activity, perfect for themed parties or gifts. This mold allows you to craft detailed chocolates easily at home, bringing joy to both kids and adults. With the right tools and materials, you can achieve professional-looking results and add a personal touch to celebrations.
Lightning McQueen’s iconic design makes it a beloved character for chocolate molds, offering endless possibilities for customization and creativity. This guide provides step-by-step instructions to help you make stunning chocolates effortlessly.
Overview of Lightning McQueen Chocolate Mold
The Lightning McQueen Chocolate Mold is a fun and creative tool for crafting chocolates shaped like the beloved character’s eyes and mouth. Designed for both kids and adults, it allows you to create detailed, professional-looking chocolates at home. Perfect for themed parties, gifts, or special treats, this mold brings the iconic design of Lightning McQueen to life in chocolate form. With its easy-to-use design, it’s a great way to add a personal touch to celebrations while enjoying a delicious and visually appealing outcome.
Importance of Using the Right Materials
Using the right materials is crucial for achieving professional-looking Lightning McQueen chocolates. High-quality chocolate ensures smooth melting and proper setting, while durable molds prevent sticking and breakage. Food-safe coloring agents guarantee vibrant, consistent details. Proper tools, like melting pots and spatulas, maintain the ideal consistency for molding. Safety and durability are key to creating stunning, long-lasting chocolates that capture Lightning McQueen’s iconic features. The right materials ensure a seamless process and a polished final product, making every chocolate piece a delightful treat for both kids and adults.
Why Lightning McQueen is a Popular Theme for Chocolate Molds
Lightning McQueen’s iconic design and global appeal make him a favorite for chocolate molds. His vibrant colors and recognizable features translate perfectly into edible art, creating delightful treats for fans of all ages. The character’s popularity spans across generations, making it an ideal theme for birthday parties, gifts, and celebrations. Chocolate molds featuring Lightning McQueen allow fans to bring their love for the character to life in a tasty, creative way. This theme combines fun, nostalgia, and personalization, ensuring a sweet and memorable experience for everyone.

Materials Needed
- Lightning McQueen chocolate mold set for eyes and mouth.
- High-quality chocolate for molding.
- Melting tools (e.g., double boiler or microwave-safe bowl).
- Coloring agents for details.
- Protective gloves and eyewear.
Chocolate Mold Set for Lightning McQueen Eyes and Mouth
A high-quality chocolate mold set specifically designed for Lightning McQueen’s eyes and mouth is essential for achieving detailed and accurate results. These molds are typically made from durable, food-grade materials like silicone or plastic, ensuring flexibility and easy chocolate removal. The set often includes separate molds for the eyes and mouth, allowing for precise detailing. Look for molds with a non-stick surface to prevent chocolate from sticking and to ensure smooth edges. Proper care and storage of the mold set will extend its lifespan and maintain its shape for future use.
Key features to consider include mold size, design accuracy, and ease of cleaning. A well-designed mold set will help create professional-looking chocolates with minimal effort, making it a worthwhile investment for themed celebrations or gifts.
High-Quality Chocolate for Molding
Using high-quality chocolate is crucial for achieving professional-looking results. Look for chocolate with a high cocoa butter content, as it melts smoothly and sets evenly. Avoid chocolate with additives, as they can affect the molding process. Dark, milk, or white chocolate options are available, each offering a unique flavor and appearance. High-quality chocolate ensures a glossy finish and a smooth texture, making it ideal for detailed molds like Lightning McQueen’s eyes and mouth.
Always choose chocolate specifically designed for molding, as it contains the right balance of ingredients for easy melting and setting. This ensures your chocolates will release cleanly from the mold and maintain their shape. Properly tempered chocolate will also enhance the overall appearance and taste, making it perfect for gifts or celebrations.
Melting Tools and Equipment
To melt chocolate effectively, you’ll need a double boiler or a microwave-safe bowl. A double boiler ensures gentle heating, while a microwave allows quick melting in short intervals. Use a silicone spatula for stirring and scraping the sides of the bowl. A thermometer is essential to monitor the chocolate’s temperature, ensuring it doesn’t burn. Additionally, a whisk or small pourer can help distribute the chocolate evenly into the mold. Having the right tools ensures smooth melting and a professional finish for your Lightning McQueen chocolates.
Investing in quality tools like a chocolate melter or electric warmer can simplify the process. These tools maintain optimal temperatures, preventing the chocolate from seizing or burning. Proper equipment ensures your chocolates turn out flawless and ready for molding.
Coloring agents for Details
For intricate details like Lightning McQueen’s eyes and mouth, use high-quality food-grade coloring agents. Candy melts in various colors are ideal for creating vibrant, precise details. Alternatively, edible markers or oil-based food coloring can be mixed into melted chocolate for consistent hues. Always opt for products specifically designed for chocolate to ensure proper bonding and texture. Avoid water-based colorings, as they can cause the chocolate to seize. These tools allow you to add personality and accuracy to your Lightning McQueen chocolates, making them stand out.
Apply colors carefully using toothpicks or small brushes for fine details, ensuring a polished and professional finish.

Preparation Steps
Gather all materials, clean the mold thoroughly, and ensure it’s dry. Melt chocolate to the desired consistency and prepare coloring agents for details. Follow safety guidelines to avoid accidents and ensure a smooth process.
Cleaning and Preparing the Mold
Start by gently washing the Lightning McQueen chocolate mold with mild soap and warm water. Rinse thoroughly to remove any residue. Use a soft cloth or let it air dry to prevent water spots. Ensure the mold is completely dry before use, as moisture can ruin the chocolate. For intricate details, lightly brush the mold with a dry, soft-bristled brush to remove dust. Avoid harsh chemicals to maintain the mold’s quality. Proper preparation ensures the chocolate releases smoothly and retains its vibrant details.
Melting Chocolate to the Right Consistency
Melt the chocolate using a double boiler or microwave-safe bowl in 30-second increments, stirring between each interval. For a double boiler, heat water to a simmer, place chocolate in the top bowl, and stir until smooth. Avoid overheating, as it can cause the chocolate to seize. The ideal consistency is smooth and pourable but not too thin. If using a microwave, check and stir the chocolate every 10-15 seconds to prevent burning. Once melted, allow it to cool slightly before pouring into the mold for even distribution and detailed results.
Adding Color to the Chocolate
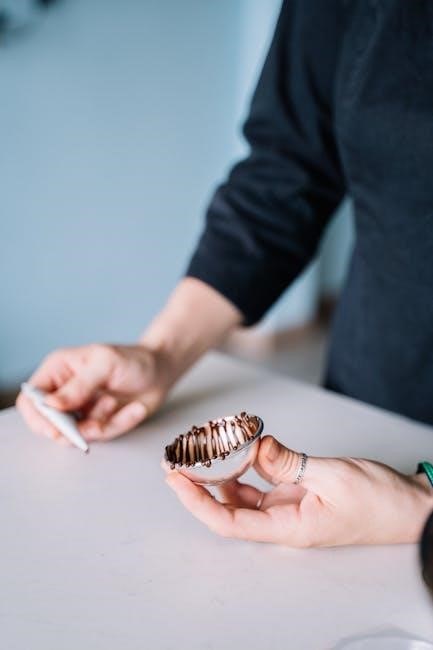
To add color, use food-grade coloring agents specifically designed for chocolate. Mix a few drops of coloring into the melted chocolate and stir well. For vibrant results, add the color before the chocolate cools. To achieve Lightning McQueen’s iconic red, use a high-quality red dye. For details like eyes and mouth, use black or dark-colored candy melts. Layering colors can create depth, but ensure each layer is set before adding the next. Avoid overmixing, as it can cause streaks. Test the color on a small area first to ensure the shade is accurate and even.
Step-by-Step Molding Instructions
Start by melting a small amount of chocolate or candy melts. Add a few drops of food-grade coloring agents, mixing until the color is evenly distributed. For Lightning McQueen’s iconic red, use a high-quality red dye. To create details like eyes and mouth, use black candy melts or dark chocolate. Pour the colored chocolate into the mold’s designated areas. Tap gently to remove air bubbles. Allow the colored sections to set before adding additional layers. This ensures vibrant, distinct colors without blending. Experiment with different shades to match your desired design perfectly.
Pouring Chocolate into the Mold
Pour the melted chocolate into the Lightning McQueen mold, ensuring each cavity is filled evenly. Use a spoon or piping bag to guide the chocolate into intricate details like the eyes and mouth. Avoid overfilling to prevent overflow. Gently tap the mold to eliminate air bubbles, ensuring smooth chocolate distribution. Allow the chocolate to set at room temperature or chill in the refrigerator for 10-15 minutes. Once set, the chocolate will release easily, creating sharp, detailed features. Proper pouring techniques are key to achieving professional-looking results and capturing Lightning McQueen’s iconic design accurately.
Ensuring Even Distribution of Chocolate
To ensure even distribution, gently tap the mold on the counter to remove air bubbles. Use a spatula or toothpick to spread the chocolate evenly, especially into small details like the eyes and mouth. Work quickly, as chocolate sets fast. By filling the mold systematically and smoothing the surface, you achieve a polished finish. Proper distribution ensures all features of Lightning McQueen’s design are crisp and well-defined, making the final chocolate piece look professional and visually appealing.
Allowing the Chocolate to Set
Let the chocolate set completely in the mold, typically 10–15 minutes, depending on the chocolate type and room temperature. Avoid moving the mold during this time to prevent imperfections. For faster setting, place the mold in the refrigerator for 5–7 minutes. Once set, the chocolate should release easily from the mold; Patience is key here, as rushing this step can ruin the design. Proper setting ensures the chocolate retains its shape and details, especially for intricate parts like Lightning McQueen’s eyes and mouth.
Removing the Chocolate from the Mold
Gently tap the mold on a flat surface to loosen the chocolate. Carefully flip the mold over a clean surface and allow the chocolate to drop out slowly. If the chocolate sticks, slightly warm the mold or use a sharp object to carefully pry it out. Handle the chocolate pieces with care to avoid breaking, especially the delicate details like Lightning McQueen’s eyes and mouth. Proper removal ensures the design remains intact and the chocolate stays in perfect shape for display or serving.

Safety Tips
Always handle hot chocolate with care to avoid burns. Use protective gloves and eyewear when melting or pouring chocolate. Ensure the workspace is clean and stable.
Handling Hot Chocolate Safely
When working with hot chocolate, always use protective gloves and eyewear to prevent burns. Keep a clean, stable workspace to minimize accidents. Use oven mitts or tongs to handle hot molds, and avoid touching melted chocolate directly. Allow the chocolate to cool slightly before pouring to reduce splashing. Never leave hot tools or chocolate unattended, especially around children. Ensure all utensils are heat-resistant and keep a fire extinguisher nearby. Proper precautions will help you enjoy a safe and successful chocolate-molding experience.
Using Protective Gloves and Eyewear
Always wear heat-resistant gloves and protective eyewear when handling hot chocolate and molds. This prevents burns and protects against accidental splashes. Ensure gloves are secure and eyewear is tightly sealed. Keep long hair tied back and avoid loose clothing that could catch fire. Use goggles with a splash guard for extra protection. Never touch hot tools or melted chocolate with bare hands. Maintain a clean workspace, and keep emergency supplies nearby. Prioritize safety to enjoy a smooth and incident-free chocolate-molding experience.
Storing the Mold Properly
To maintain the quality and longevity of your Lightning McQueen chocolate mold, proper storage is essential. After use, clean the mold thoroughly with mild soap and warm water, ensuring no chocolate residue remains. Dry it completely with a soft cloth to prevent moisture buildup. Avoid exposing the mold to direct sunlight or extreme temperatures, as this can warp or damage the material. Store it in a protective case or airtight container to shield it from dust and other contaminants. Keep the mold in a cool, dry place, such as a cupboard or drawer, to preserve its shape and ensure it remains ready for future use.
For added protection, consider wrapping the mold in a soft, lint-free cloth before placing it in storage. This prevents scratches and minor damages. Regularly inspect the mold for signs of wear and tear, addressing any issues promptly to maintain its condition. Proper storage ensures your Lightning McQueen chocolate mold remains in excellent shape for countless creative projects. By following these steps, you can enjoy consistent results and extend the mold’s lifespan, making it a reliable tool for your chocolate-crafting endeavors.
Troubleshooting Common Issues
Common issues include bubbles, uneven edges, or chocolate sticking to the mold. Tap the mold gently to remove bubbles and ensure it’s properly greased. Smooth edges with a knife or melter for a clean finish. If chocolate sticks, warm the mold slightly and gently twist it to release the piece. Proper preparation and technique are key to achieving flawless results every time.
Dealing with Bubbles in the Chocolate
Bubbles in the chocolate can ruin the smooth finish of your Lightning McQueen mold. To fix this, gently tap the mold on the counter to bring bubbles to the surface. Use a toothpick or a small tool to pop them. For persistent bubbles, lightly vibrate the mold or heat it slightly with a hairdryer. Ensure the chocolate is melted to the right consistency, as overly thick chocolate can trap air. Proper preparation and a steady hand will help you achieve a bubble-free finish. Patience and attention to detail are key to creating flawless chocolate pieces.
Fixing Uneven Edges or Imperfections
Uneven edges or imperfections in your Lightning McQueen chocolate can be easily corrected. Once the chocolate is set, use a sharp knife or a small, flat tool to gently trim excess chocolate around the edges. For minor imperfections, melt a small amount of chocolate and carefully fill in the gaps. Allow it to set before smoothing the area with a clean cloth or brush. If edges are too rough, lightly sand them with fine-grit sandpaper. Practice makes perfect, so don’t be discouraged by small mistakes—turn them into opportunities to refine your technique and achieve a polished finish.

Preventing Chocolate from Sticking to the Mold
To prevent chocolate from sticking to the Lightning McQueen eyes and mouth mold, ensure the mold is properly prepared. Lightly spray the mold with cooking spray or brush it with a small amount of oil. Allow the chocolate to set completely at room temperature or chill it in the refrigerator for about 10 minutes. Once set, gently flex the mold to release the chocolate. For added security, dust the mold with cocoa powder or cornstarch before pouring in the chocolate. This creates a barrier, ensuring the chocolate releases smoothly and without sticking.
Customization Ideas
Personalize your Lightning McQueen chocolates by adding unique details, such as edible paint for the eyes or colored cocoa butter for a vibrant finish. Experiment with different molds or themes to create a one-of-a-kind design that matches your celebration’s style.
Use various chocolate colors or flavor combinations to offer a personalized touch. This allows you to tailor the chocolates to specific themes or preferences, making them truly special and memorable.
Adding Personalized Details to the Chocolate
Enhance your Lightning McQueen chocolates by adding personalized details such as edible markers for the eyes and mouth or textured patterns using molds. This creates a unique and recognizable character design. For a special touch, use colored cocoa butter or edible paints to add vibrant hues, making each piece stand out. You can also incorporate personalized messages or names nearby, perfect for gifts or themed parties. These small details transform simple chocolates into memorable treats that reflect individuality and creativity, ensuring each piece is truly special and cherished.
Using Different Colors for Various Themes
Customize your Lightning McQueen chocolates by experimenting with vibrant colors to match different themes or occasions. Use red for a bold, speeding look or metallic silver for a sleek, racing vibe. Edible dyes or colored cocoa butter can add realistic details to the eyes and mouth, enhancing the character’s expression. For seasonal themes, try green for Christmas or pastel shades for Easter. This versatility allows you to tailor the chocolates to fit any celebration, making them both visually appealing and personalized. Color adds an extra layer of creativity and fun to your chocolate-making process.
Creating a Full Lightning McQueen Figure
To create a full Lightning McQueen figure, start by using the provided eyes and mouth mold for the facial features. Then, shape the body using red chocolate, either with additional molds or by forming it freehand. For details like wheels, use small circular molds in black chocolate and attach them with a dab of melted chocolate. Simplify features to manage scaling and use edible markers for finer details. Ensure high-quality chocolate for a smooth finish and plan the project over several hours to allow each part to set properly before assembly. This creative process combines molding and layering techniques to achieve a detailed and memorable chocolate figure.
Presentation and Storage
Display the chocolates on a themed tray or stand to highlight their design. Store them in an airtight container at room temperature to maintain freshness. Use protective wraps for gifting and ensure the mold is cleaned and dried properly after each use to preserve its quality and longevity.
How to Display the Finished Chocolate
To showcase your Lightning McQueen chocolates, arrange them on a decorative tray or tiered stand. For a themed presentation, place them on a racing-themed backdrop or alongside small toy cars. Wrap individual chocolates in transparent wraps or bags with ribbons for a professional look. For parties, consider arranging the chocolates to resemble a race track or a checkered flag. To add a personal touch, place a small card with Lightning McQueen’s logo or catchphrase beside the display. Store leftovers in an airtight container to maintain freshness and keep them away from direct sunlight or moisture.
Storage Tips to Maintain Freshness
To keep your Lightning McQueen chocolates fresh, store them in an airtight container in a cool, dry place. Avoid direct sunlight, as it can cause melting or discoloration. Use wax paper or parchment liners to prevent sticking. For long-term storage, wrap individual pieces in plastic wrap or aluminum foil. Keep the container away from strong-smelling foods, as chocolate can absorb odors. Store at room temperature (60-70°F or 15-21°C) to preserve texture and flavor. Avoid refrigeration unless necessary, as condensation can affect quality. Proper storage ensures your chocolates remain vibrant and delicious for a longer period.
Packaging Ideas for Gifts or Parties
For a thoughtful gift or party favor, package your Lightning McQueen chocolates in themed boxes or bags. Use clear plastic wraps or cellophane bags to showcase the details. Add personalized tags with the recipient’s name or a special message. Ribbons or bows in red and yellow, Lightning McQueen’s signature colors, can enhance the presentation. Consider pairing the chocolates with small party favors, like stickers or mini toys, for a complete gift set. Keep packaging clean, durable, and food-safe to ensure the chocolates arrive fresh and intact. Creative packaging turns your handmade chocolates into memorable treats for any occasion.
With these instructions, you can create impressive Lightning McQueen chocolates. Experiment with colors and designs to make each piece unique. Share your creations with friends and family for memorable treats!
Final Tips for Successful Chocolate Molding
For successful chocolate molding, ensure the mold is clean and dry before use. Melt chocolate evenly to avoid bubbles, and tap the mold gently to remove air pockets. Allow chocolate to set completely to prevent sticking. Experiment with colors and details to enhance the design. Store finished chocolates in a cool, dry place to maintain freshness. Practice makes perfect—don’t be discouraged by minor imperfections. Most importantly, have fun and enjoy sharing your creations with others!
Encouragement to Experiment and Create
Don’t be afraid to let your creativity shine! Chocolate molding is a fun and versatile craft that allows you to experiment with colors, designs, and themes. Try adding unique touches like edible glitter or personalized messages to make your creations stand out. Each piece can tell a story or match a special occasion. Remember, practice enhances skill, so keep exploring new ideas and techniques. The process is just as rewarding as the final result, so enjoy the journey of creating something truly unique and delightful for yourself or others to cherish.